Thursday, May 31, 2012

The Hens Den Mid Year Design Team Member Call

We have grown this year and we would love to grow more.

We are looking for 2 more talented team members who can create a minimum of two blog projects per month and 1 newsletter using store product that will be supplied to you.  Time is running out.  Be sure to get your submissions in soon!

We are looking for the following skills:
A couple of people who loves making cards, layouts, mini books/albums, home décor/altered projects.
You can be great at just one or two of these or all, we'd love to see your best work!

We are looking for someone who:
  • Is a follower of The Hen’s Den
  • Has an active blog
  • Is capable of meeting deadlines
  • Has strong photo skills
  • Can write instructions on how they created their design/layout/project

How to Apply:
  • Send e-mail to info@thehensden.com with your name, address, phone number a brief description of yourself and why you would like to be a part of The Hens' Den design team.
  • Submit one unpublished project showing off your strongest talent – layout, card, mini album, home décor/altered project - if chosen we will use your submission when we announce the new team members
  • Link to your blog
  • Link to Facebook page
  • Link to online galleries
  • Other information if applicable:
    Active on any message boards?
    Any other social media you actively participate in?
    Are you on any other design teams?
    Do you teach classes?
Benefits upon signed contract for one year term beginning August 1st 2012:
  • A permanent link on the blog directly to your blog
  • For every post a link to your blog directly to you
  • Product shipped to you for the monthly deadlines
  • Store discount
  • If you are teaching we will post it on the websites event calendar and on the design team blog.

Deadline:
Today through June 30th, 2012


Announcements will be sent out to the winners by 7/3/2012.

Please send your unpublished project & links to Info@thehensden.com with “(Your name + DESIGN TEAM SUBMISSION” in the subject line.

At this time we are unable to accept international design team submissions.

Good Luck and we look forward to your submission
The Hens' Den

Monday, May 28, 2012

Memorial Day Sale! Plus a demo using the Teresa Collins Stampmaker by Cheri Piles

Memorial Day Sale!! Stop by the store to see selected items up to 70%! (CLICK HERE!)

Today  - The Teresa Collins Stampmaker is 25% off!  Here's a little demo I did on how to think outside of the box when it comes to creating your own personalized stamps! 

The package comes with software or you can use your own. For this project I used the software and pulled The Hens' Den logo into it, changed it to black and white, "inverted" the image - that's the term to make the background black and your image white. Then you print it out.


 The next step is to put it in the magnetic clamp - place your pink gel packet with the words "imagepac" upside down then lay your negative over the top also face down. Then you put it in the machine and cook it for 6 seconds face up then 1min 40 seconds face down. Do not over cook your stamp.
 I'm so sorry this next image is so blurry but you can see the image has now been cooked into the gel and you cut around it - I suggest doing this right over your garbage can because there is still liquid gel (the part of the stamp that does not turn into the stamp). Then take it to your sink and wash it with soap and water. Cook it again for another 2 minutes (I know the picture says 3 but I was changing it to two!)
 
This is what your completed stamp looks like once it is fully cooked and trimmed out. This took less than five minutes to create and look at how Charlie is using it on the bags! Super cute!!


Thursday, May 24, 2012

Basic Grey Collection - Apple of My Eye layout by Nicolle Kramer


Apple of My Eye Layout
Designed by: Nicolle Kramer
Featuring : Basic Grey -Picadilly collection

These photos are from when my kiddos were munchkins. Ryan was 5, Bret 4 and Kayla 2. My children of course are the apples of my eye and loved that I captured them in the middle of eating one.


Flower Cluster

Top left cluster

Supplies/ Click to find them in The Hens Den Store:

Preparing your layout:
  • For base I used 12"x12"Refridgertor magnet paper.
  • Measure 2" in on the apple orchard paper and cut so your left with a border.
  • Cut 8"x7" piece from bread box paper
  • Cut 7"x6" piece from lemongrove paper
  • Cut 6 1/4" x 3 1/2" from white card stock and attach (2) 2 3/4"x 3" photos.
  • Cut 1 1/2" x 8" piece from apple orchard b side and border punch.
  • Cut large pennant flags  1 large from three layer cake, 2 medium from fresh baked bread and 2 from apple orchard b side.
  • Cut 6 " ribbon and tie into blow.
  • Cut out rosettes from ribbon to make individual flowers.
Assembling your layout:
  • Attach cut border cut from apple orchard paper to base refridgerator magnet paper.
  • Attach bread box paper to bottom right corner directly next to apple orchard paper.
  • Attach lemongrove avenue paper and center it onto bread box paper.
  • Attach your matted photos to center of lemongrove paper.
  • Attach apple tree chipboard sticker between the two photos. 
  • Attach and cluster cream rosettes,chipboard flowers,and ,metals below your photos.
  • Attach 2 chipboard photo corners to top outer corners of photos.
  • Top right corner above photo attach die cut shapes (layered) and add your title with echo park alphas.
  • To top left corner attach your pennant flags, chipboard elements and ribbon.
  • I used 3d square adhesives for dimension.
  • I also distressed the edges of my papers.

Wednesday, May 23, 2012

Bo Bunny - Country Garden Layout by Charlie Labonte


As a new Grandma to a beautiful Grand Daughter, I am finally getting to play with pink colors and flowers.   Autumn is 5 months old and is already learning to be a camera ham.  I made her Mom an album when she was born so that she could document the first year, each and every month.  This is month 5.   All of the pictures feature Autumn in a frilly outfit and I love it.  She has the biggest eyes and seems to be looking right at you.   


Layout using Bo Bunny's Country Garden Paper line and embellishments, along with Petaloo's Color Me Crazy Chipboard pieces.

1 - I used as my base Tim Holtz's Distress Sage Card stock.  I distress the edges to add some
                                                                                     character
2 - The next layer was Bo Bunny Country Garden Vines, but I used the reverse side.  I cut one inch off so that the paper would be framed by the card stock
3 - Using one of  Martha Stewart's floral punches, I punched along the outer edge  and taped it down onto the card stock

4 - I layered the picture on pink card stock and then framed it in with Cream Satin pleated ribbon from Maya Road

5 - On the left side, I place a half circle of cream colored crocheted daisy's from Maya Road.  In the center of them I  glued on the little gems from the Country Garden Line.  Next, I glued the daisy's in place. 

6 - Using Petaloo's Color Me Crazy Chipboard Small Frames, I cut the smalles of the frame set into 2 pieces.  I then used paint (Adirondack Shell Pink) and colored them.  While the paint was wet, I covered them with clear embossing powder and used my heat gun to dry them.  Then I taped them in place using Scor-Pal double sided tape

7 - Using Petaloo's Color Me Crazy Chipboard Butterflies, I colored them using Perfect Pearls and then added the gems from the Country Garden line. On the larger piece, I painted the circle and flower and again used embossing powder to give them a nice shine (I over heated them a bit, so be careful of this)

8 - Using the Country Garden Deminsional Stickers, I layered along the bottom of the layout around the Petaloo Butterfly. 

9 - Next, I used the Heaven Sent Card Stock Sticker phrases on the left side

Products used:


Thank you for stopping by

Friday, May 18, 2012

Weekend giveaway!


How to enter: 


Do one or more of the items below and leave a comment for each opportunity you participate in by SUNDAY at 8pm PST. 


1. Leave us a comment 


Additional chances - Each item gives you 1 entry into the giveaway


2. Follow The Hens' Den on Google Friend Connect and leave a comment that you are a new follower! (Just click the blue link on the right that says "Join This Site")


3. Like The Hens' Den on Facebook - you can just click on the right in the Facebook Like box - and leave a comment (If you allready like me on Facebook - leave a comment that you like me!


4. Share this link with the giveaway to your friends on Facebook and comeback and leave comment with your link.


5. Follow us on Twitter and come back and leave a comment with your link (If you are allready a follower - leave us comment with your link)


6. Tweet about the giveaway - come back and leave a comment with the link you shared.


Random drawing will be held Sunday evening at 8pm PST and winner will be announced on Monday! 


Good luck and have a great weekend!! 


Thursday, May 17, 2012

Cute Caroline by Guest Designer Sesil Cratin using Simple Stories Fabulous Collection


Cute Caroline Layout
Created by: Sesil Cratin
Featuring Simple Stories Fabulous Collection


Supplies:

InLinkz.com

  • Bazzill Cardstock - Burning Ember
  • brown lace
  • green ribbon
  • My Minds Eye Clips
  • Therm O Web - Supertape
Instructions:
  1. Add the 9x12 Sweet pattern paper to the bazzill cardstock in the center of the page.
  2. Adhere the brown lace on the right had seam of the pattern paper and the cardstock
  3. Attach the scallop border sticker from the Fundamental Sticker sheet to the left hand side of the seam of the pattern paper and the cardstock.
  4. Attache the 9x10.5 round the edges of the 100% girl paper and adhere to the layout.
  5. Using the Supertape adhere the wide green ribbon to the left hand side of the 100% girl paper
  6. Add a brad to a scallop stick add to the center of the Petalloo flower and attach to the middle of the ribbon.
  7. add the 6x7 (rounded corners) of the all about me pattern paper to the middle of the page.
  8. Add the Fabulous 6x8 bracket cutout page and adhere to the right hand side of the page.
  9. Add photos
  10. Add the bottom bracket under the photos.
  11. Embellish with flowers, stickers, and decorative clips. Also add brads the center of the doily stickers with using the 3d foam squares to adhere to the page to give more depth to the layout.
sesilcratin.blogspot.com


Wednesday, May 16, 2012

May 2012 Newsletter

We are so excited for this months newsletter, the girls did some amazing projects!


Tuesday, May 15, 2012

Tuesday Spotlight - Ranger U - May 2012

WOW.. What an experience.   You go through such a roller coaster of emotions when you start this endeavor.  From the time I completed and submitted the application to the very end when you get your class photo.   But I made it.  Whew.......

Last fall when I applied, I did not think I had a snowball's chance in hell to get selected to go.  They only pick 24 students for each class each year.   There are two of them, late April and early May.  Then you wait until late March for the email...Yes...No.   I got the one that said "CONGRATULATIONS".  I was in shock, totaly.  Yes, I sure was.  Still am.   But the journey has only just begun.

Booking the flight and hotel was "ok"... took a bit to find a flight that would get me to NJ at a decent hour.  Sea Tac, however, have some rude TSA agents.  Honestly, I do not travel much and I forget the "finner" details about traveling.  So when I thought I would travel "light", I thought I had my plan all organized.  Usually when I fly, I check ALL of my bags because I hate waiting for all the sillies to put their over stuffed carry-on's in the overheads.  So, I get to security, unload my laptop (I knew to do this) took off my shoes (knew to do this) and put everything in plastic bins (knew to do this).   Watch my luggage/laptop go in the machine and they never came out!!!!  The next thing I hears is "LUGGAGE CHECK"  and still not understanding and waiting for my bags, the TSA dude came up to me WITH my bag and asked if it was mine... Yes Sir, it is??!!!  Well, we have a lesson to learn, he says'.  Taking all the stuff out of my bag (in front of everyone, who are by now all watching me) and lays out my plastic bag of hair stuff, tooth paste and so on.   Well...Did you know you are suppose to take this bag OUT of your luggage?   No Sir, I do not really fly that much and rarely take carry-on luggage, why?  "These bottles are not legal"  WHAT!!!... Oh shoot... "do you want to toss them or check the bag?"   me- "I paid good money for that stuff and I am not tossing it"...he- then you have to check it.  me- then you put my stuff bag in my bag and I will.. by now I am getting upset and he is being a turd and everyone is staring... So he walks me out of security, holding my bag for everyone to see and does not even give me a kiss when he is done.  I was so embarrased.  Jerk.. bag checked and I finally get on the plane.
5 + hours later, we landed. Had a nice ride to my hotel, time to check in.   OH MY GOSH!!!!!!  She asked for my ID.. I had it in my pocket.  Where is it?  As I tear through all my stuff,  GONE!  Crap, the last time I saw it was when I check in my bag.   UGH... then my brain flashed.. I called United and asked them if they could check the seat I was sitting in because I may have left it there because I vagely remember something dropping in between the seats.... "no, they will not take out the seats to get My Driver licenses".  How do I get back on the plane, I ask.   The response was not what I wanted to hear.  Called my husband and he is in a panic.. Wife stuck in NJ!!!... then I my heart hits the floor.... WAIT.... I run to my wallet and peak in a secret place and there is my PASSPORT!!!...  I started to cry... day saved.

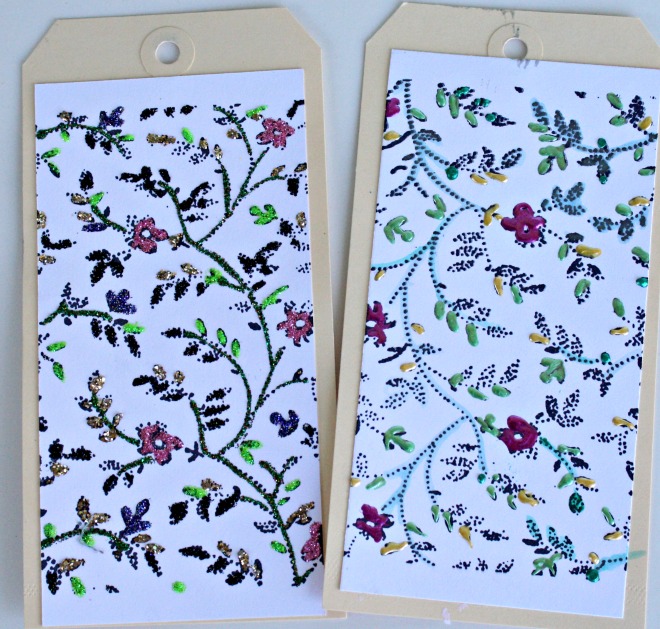
Ok, The next 3 days are very intense and jammed packed full of information and skills and tricks and secrets.  I made 80 tags over those 3 days, using a varitiety of techniques.  You arrive at 9 am sharp and you are there in class until 6 pm...long days.  

Day 1 - We got a tour of the plant.  They make everything there.  All by hand, with some help from machines of course. Those Distress ink pads, they are put together by hand! Not a machine.  Boy did those girls have some pretty fingers. Darn good thing they had gloves on. What fun, I got to pick a bottle of stickles right off the assembly line..Whoo Hooo!   Ok, tour over we have to get to work and start making our tags.  Some of the tags are shown below.

Perfect Pearls - I did not know that you could do so much with this beautiful fine powder. My favorite in this section was the Faux Suede tag. It looks and feels like leather and the colors on the paper are just beautiful.


 Shabby chic embossing with paint...I want to try this again.
 Altering metal and the embossed foil was so cool!
 Layering inks- stepping out of my color pallet....FUN!
 Grunge, foil and layering inks....I want to play!!!
 More foil and tranfer and sticky back canvas (my fav was the canvas, far right)
 Ink washing - this is a must do again.
 Distress markers and embossing powders - love altering things!!!
 Dylousions Sprays - Oh So Pretty!!!!
 Glossy Accents and colloage art - reminds me of school when I made the heart.
 The Melting Pot and Utee!!!-   My new best friend!
 Stickles and Liquid Pearls -  LOVE!

My most fav of all - altered metal art.  Using the Melting pot is going to change my neckline alot...lol

I cannot leave out all the fun we had and the food!... Mario took really great care of us. Square pizza was on the agenda this day and the salads were awesome!
Then, there are the great people that you meet.  I was not able to get all of their pictures, I had my head buried in projects.   :(
 Kaz - she loves her "stashes" and I love her accent.  She is from England.  She taught me a word..."gobsmacked" = I am over whelmed/blown over.  There was another one but I best leave that one in my head...lol
 Kate, Dy and Kaz being silly- The 3 amigos!
 Alain, one of the owners took a bath in yellow stickles and this is what the coat looks like.  It is stiff as a board and they are protecting it carefelly...it is really funny to see.  He was wearing when they dumped the stickels on him....lol
 Tim and Claudine teaching- Tim is such a ham and there is a very funny side to him.  It took all I had to hold back those 3 days.  Especially when he started talking about his "cracks".  Claudine  is so sweet and gental but don't let those looks fool you, she is one sharp cookie!
Dy teaching - she is a hoot.  I did not know what to expect but I loved her personality.  She is whitty and funny and very sincere.  Love her!

After 3 long and very intense days of learning, it was time to leave and I almost cried.  I wanted to stay and learn more.  But it was time to take the final picture:
Ranger U Graduating Class of May 4 - 6 2012 @ Ranger Ink in Tinton Falls; New Jersey.  I cannot tell you have much I really enjoyed myself.

Thank you for stopping by... Have a great day!
Related Posts Plugin for WordPress, Blogger...